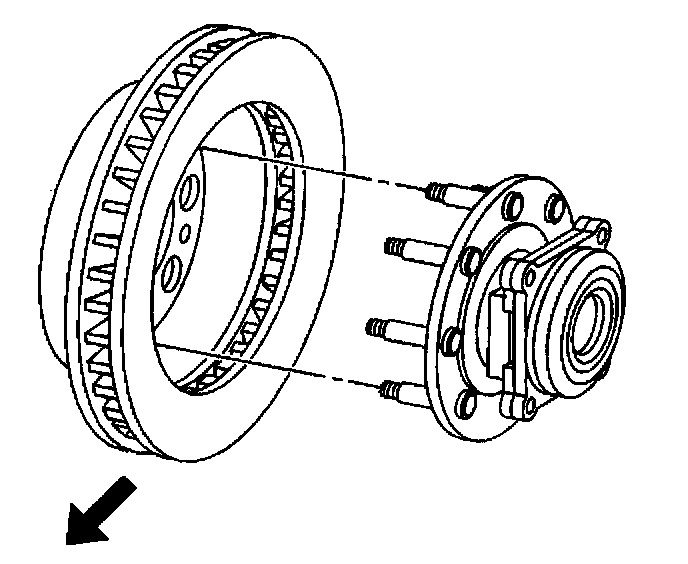
Front Rotor
Brake Rotor Replacement - FrontRemoval Procedure
1. Inspect the fluid level in the brake master cylinder reservoir.
2. If the brake fluid level is midway between the maximum-full point and the minimum allowable level, no brake fluid needs to be removed from the reservoir before proceeding.
3. If the brake fluid level is higher than midway between the maximum-full point and the minimum allowable level, remove brake fluid to the midway point before proceeding.
4. Raise and support the vehicle. Refer to Vehicle Lifting.
5. Remove the tire and wheel assembly.
6. Remove the front wheel hub extension (dual wheel vehicles only).
^ Insert a drift or large screwdriver through the brake caliper into one of the brake rotor vanes in order to prevent the rotor from turning.
^ Mark the relationship of the front wheel hub extension to the hub.
^ Remove the front wheel hub extension bolts.
^ Remove the front wheel hub extension from the vehicle. It may be necessary to tap around the perimeter of the hub extension with a rubber mallet to loosen it from the hub.
7. Mark the relationship of the rotor to the hub.
8. Remove the brake caliper bracket mounting bolts.
9. Remove the brake caliper and brake caliper bracket as an assembly.
10. Suspend the caliper assembly from the vehicle using heavy gauge wire. Do not allow the caliper to hang from the brake hose.
11. Remove the rotor retaining push nuts from the wheel studs (if applicable).
12. It may be necessary to strike the end of the hub or the rotor with a deadblow hammer to separate the rotor from the hub.
13. Remove the rotor.
14. If the rotor is difficult to remove due to corrosion in the hub area use the following procedure to remove the rotor (25 and 35 series only).
^ Clean all the surface areas and the threaded holes of contamination.
^ Generously apply penetrating oil or the equivalent to the hub/rotor area.
^ Insert (2) M10 x 1.5 bolts pack screws) into the threaded holes of the rotor.
^ Tighten both bolts evenly to force the rotor from the hub.
Installation Procedure
1. Clean all rust and contaminants from the mating surfaces of the brake rotor and the hub flange.
2. Clean all rust and contaminants from the inside diameter of the hat section of the brake rotor to prevent any foreign material from getting between the brake rotor and the hub flange.
Important: If the rotor was removed using the jack screw method you must ensure that the hub flange is free of nicks or marks caused by this procedure. Remove all raised nicks or marks before installing the rotor.
3. Align the rotor to its original position on the hub (if applicable) and install the rotor.
4. Install the caliper assembly.
5. Perform the following procedure before installing the brake caliper bracket mounting bolts.
^ Remove all traces of the original adhesive patch.
^ Clean the threads of the bolt with brake parts cleaner or the equivalent and allow to dry.
^ Apply Threadlocker GM P/N 12345493 or RED LOCTITE #272 to the threads of the bolt.
Notice: Refer to Fastener Notice in Service Precautions.
6. Install the caliper bracket mounting bolts.
^ Tighten the brake caliper bracket mounting bolts to 175 Nm (121 ft. lbs.) (15 Series).
^ Tighten the brake caliper bracket mounting bolts to 300 Nm (221 ft. lbs.) (25 and 35 Series).
7. Install the front wheel hub extension (dual wheel vehicles only).
^ Insert a drift or large screwdriver through the brake caliper into one of the brake rotor vanes in order to prevent the rotor from turning.
^ Align and install the front wheel hub extension to the original position on the hub.
Important: Follow the same tightening sequence for the front wheel hub extension that is used on an eight lug wheel.
^ Install the front wheel hub extension nuts. Tighten the front wheel hub extension nuts to 130 Nm (96 ft. lbs.).
8. Install the tire and wheel assembly.
9. Remove the safety stands.
10. Lower the vehicle.
11. With the engine OFF, gradually apply the brake pedal to approximately 2/3 of it's travel distance.
12. Slowly release the brake pedal.
13. Wait 15 seconds, then repeat steps 11-12 until a firm pedal is obtained. This will properly seat the brake caliper pistons and brake pads.
14. Fill the master cylinder reservoir to the proper level with clean brake fluid.